
When an API Forgot to Lock Its Door
It started like any other deployment.
A young developer pushed their first public API live: a small service for fetching product listings. Everything worked perfectly in testing. Within hours, thousands of records were scraped.
The culprit? A single testing key is left inside the code.
No hacker army, no zero-day exploit. Just one overlooked key.
By the time the team noticed, their data had been mirrored across multiple scraping forums. The logs told a painful but straightforward story: the API forgot to lock its door.
And this isn’t a rare slip. In May 2025 alone, over 180 million credentials were exposed through unsecured APIs, most of which lacked even basic authentication. The modern API economy moves fast, but security oversights move faster.
The real lesson here isn’t fear. It’s recognition. Every team, at some point, has shipped something too quickly. But in today’s connected world, APIs aren’t just pipes that shuffle data between systems. They’re how your business exposes trust to the world.
And trust, once lost, doesn’t return easily.
That’s why this guide isn’t another checklist of “best practices”. We’re walking through how APIs actually prove identity, control access, and maintain security, not just once, but continuously, every time a request hits your server.
So before we add tokens, headers, and JSON payloads, let’s start simple. Let’s meet the two guards standing at every digital gate: the ones who decide who gets in, and what they can do once they’re inside.
Step 1: Understanding the Two Gatekeepers
Think of your API like an airport.
Every passenger needs to show an ID to enter. That’s authentication.
But not everyone who enters can board every plane. That’s authorization.
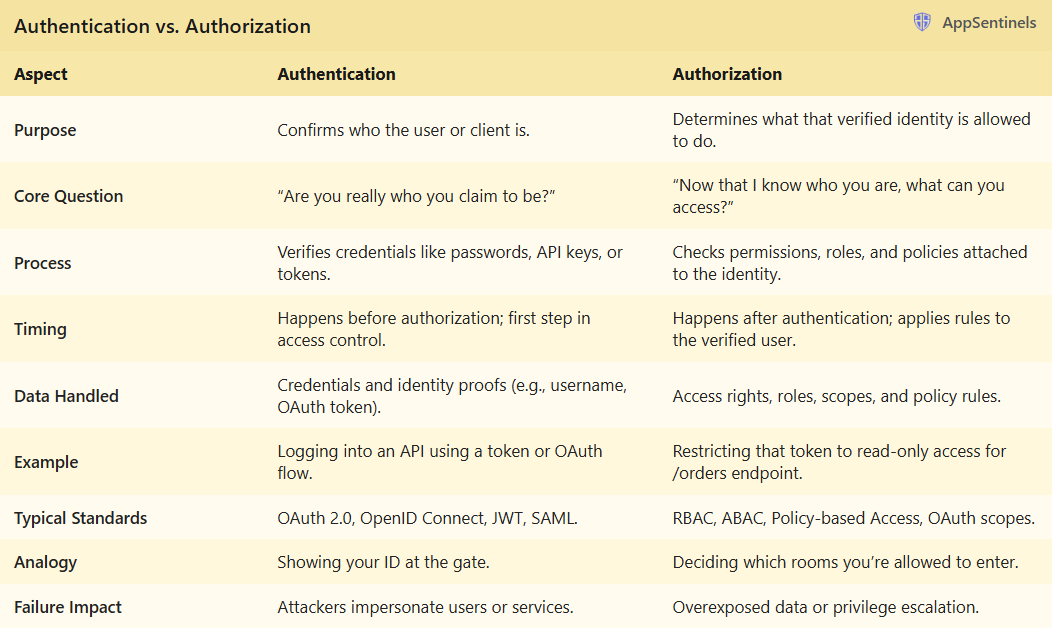
These two guards (AuthN and AuthZ) stand side by side, yet many confuse them because they look so similar in practice. They both use tokens, both happen near the start of a request, and both decide access. But conceptually, they answer very different questions:
- Authentication: “Who are you?”
- Authorization: “What are you allowed to do?”
You can think of authentication as introducing yourself: proving you are who you say you are.
Authorization comes next. It determines what you’re permitted to do now that you’re trusted.
For developers, it’s the difference between:
- Logging in with your credentials (AuthN)
- Trying to access /admin after login (AuthZ)
One verifies your identity; the other enforces your boundaries.
They often appear together in API flows, but keeping them conceptually separate helps design cleaner, more layered security systems. These are systems that don’t just open doors, but open the right doors for the right people.
Different needs? Check out How to Secure an API Without Authentication.
Now that we’ve met the guards, let’s step into the terminal and see where they stand: inside the request flow that determines every API interaction.
Step 2: What Really Happens When an API Request Arrives
Every API call takes a journey.
It starts the moment your client app (maybe a mobile frontend, perhaps a partner integration) sends a request. That single HTTP call begins moving through a series of invisible checkpoints, each one inspecting, validating, and deciding what happens next.
You can think of it like walking through a high-security building.
At each door, someone asks a different question before letting you pass.
Let’s follow one request and see where those doors stand.
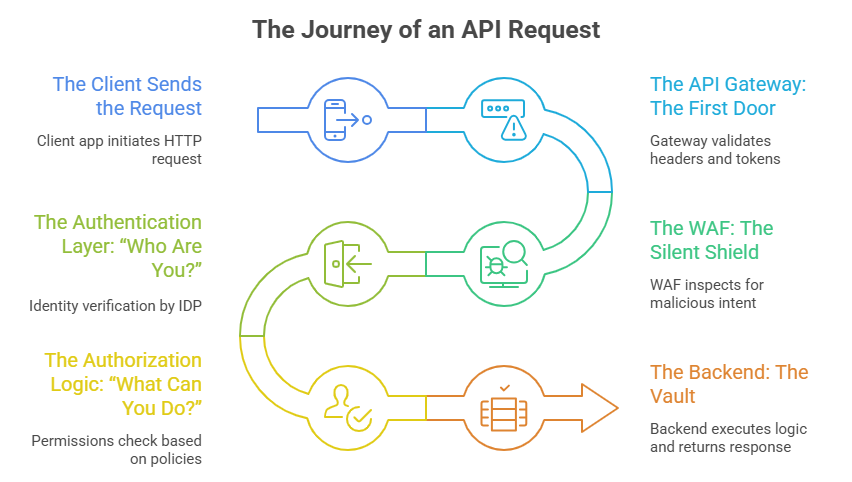
1. The Client Sends the Request
It begins at the source: the client app.
A mobile or web client sends an HTTP request that includes a token, an API key, or OAuth credentials. These aren’t just headers. They’re proofs of identity.
Maybe it’s a GET /user/profile call with a JWT attached in the header. Maybe it’s a GraphQL query. Either way, the client is saying:
“Here’s who I am, and here’s what I want to do.”
2. The API Gateway: The First Door
Before the request reaches your backend, it passes through the API Gateway. This is the first real gatekeeper.
The gateway validates headers, checks for missing tokens, enforces throttling, and decides whether this request should proceed.
It’s part traffic controller, part bouncer. It ensures fair use, logging activity, and stopping basic abuse before it reaches anything sensitive.
If the API Gateway is your front desk, then your security scanner stands just ahead of it.
3. The WAF: The Silent Shield
A Web Application Firewall (WAF) inspects every incoming request for malicious intent.
It scans payloads for SQL injections, XSS attempts, or suspicious patterns, and blocks them outright.
An attacker might weaponize a request that looks normal to a developer. The WAF’s job is to catch that before the API Gateway ever sees it.
Confused between API Gateways and WAFs? Read API Gateway vs WAF.
4. The Authentication Layer: “Who Are You?”
Next, the request enters the authentication layer. This is where identity is verified.
Here, the system checks if the token or credential attached to the request is valid, unexpired, and actually issued by a trusted Identity Provider (IDP).
That could be an OAuth server, an enterprise SSO, or a trusted directory like Active Directory or Auth0.
If the signature matches and the token hasn’t expired, you’re cleared for the next gate.
5. The Authorization Logic: “What Can You Do?”
Now that your identity is confirmed, the system checks your permissions.
Are you an admin or a regular user? Are you allowed to access /api/v2/admin/settings?
This is where authorization policies come into play. Sometimes they’re role-based, sometimes attribute-based, and sometimes enforced by external agents like the Open Policy Agent (OPA).
The system doesn’t just know who you are; it now decides what you can do.
6. The Backend: The Vault
Finally, the request reaches the backend. This is the vault of your data and business logic.
At this point, the layers of defense have filtered and validated everything.
The backend executes the logic, fetches data from the database, and returns a response, ideally to the same person who requested it.
Each of these steps (WAF, API Gateway, IDP, Authorization Service) plays a unique role in securing the journey.
Miss even one, and a malicious request could slip through an open door.
To finish it off:
Every API call makes this trip hundreds, sometimes thousands of times a second. And when each door does its job, your system stays not just functional, but trusted.
Now that you can visualize the journey clearly, let’s zoom in on the first guard.
How does an API actually know it’s you? Let’s start with the basics: authentication.
Step 3: How APIs Recognize You (Authentication Methods)
By now, we’ve seen how every request passes through gates, each asking questions like, “Who are you?” and “What do you want to do?” But how does an API actually know it’s you in the first place?
The answer lies in authentication methods: the different ways your digital identity proves itself at the door. And, as with any security evolution, it all started with something simple.
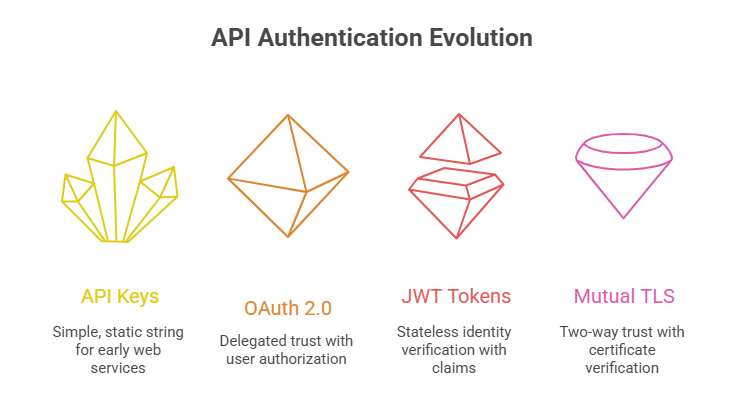
1. API Keys: The Training Wheels
Before tokens, scopes, or complex flows, there were API keys. A developer would generate a key (a simple, static string) and include it in every request. If the key matched what the server expected, the request went through.
It was fast, easy, and worked beautifully for early web services or server-to-server integrations. No redirects. No handshakes. Just a key and a request.
But here’s the catch: API keys don’t know who’s behind them. They identify what is calling the API, not who.
It’s like putting a spare key under the doormat. It works, but it’s not where you want to stay.
Anyone who finds that key (in a repo, in logs, or in an exposed environment variable) can impersonate you completely. Rotation becomes a nightmare, revocation lacks visibility, and once leaked, it’s game over.
So while API keys still have their place (internal microservice calls, quick prototypes, or low-risk integrations), they’re like training wheels. They get you moving, but you’ll need something more secure before you start riding on real roads.
As apps grew and users began authorizing third-party tools (think of “Sign in with Google” or “Allow Spotify to access your fitness data”), the old doormat key just didn’t cut it anymore.
We needed a smarter, safer, and more flexible way to prove identity.
Enter OAuth 2.0: the protocol that changed how the internet trusts.
2. OAuth 2.0: The Modern Standard
Picture this: You install a new fitness app. It asks if you’d like to log in using your Google account. You tap Yes.
But notice what happens. You never give the app your Google password. Instead, Google shows a permission screen, you approve access, and behind the scenes, Google issues a token. This is a digital hall pass that says:
“This user allowed the fitness app to read limited profile data, nothing more.”
That’s OAuth in action.
Let’s break down how it actually works, step by step:
- User Authorizes Access
You click “Login with Google”. The app redirects you to Google (the identity provider). - Provider Returns an Authorization Code
After you approve, Google sends the app a short-lived code. Not the token itself yet. - App Exchanges the Code for an Access Token
The app securely calls Google’s token endpoint and trades the code for an access token. - The token is used for API calls.
The app now uses that token to fetch user data, safely, without ever seeing your password.
These tokens come with scopes: clearly defined permissions that tell APIs what the client can and can’t do. For example: read:user_profile, post:activity, or access:email.
That single concept (scopes) is what made OAuth universal. It decoupled authentication from authorization and allowed third-party apps to safely act “on your behalf” without compromising your credentials.
From social logins to enterprise SSO and API integrations, OAuth 2.0 became the world’s common language for delegated trust.
OAuth helps APIs know who you are. But what if an attacker steals that token or intercepts a session? How can the API be sure you’re still you, every time, in every call?
That’s where tokens enter the picture, carrying your digital identity across each request, securely and verifiably.
3. JWT Tokens: Identity You Can Carry
If OAuth was the handshake, JWTs (JSON Web Tokens) became the passport you carry afterward.
Every time you call an API, you present this passport, and the server instantly knows who you are, what you’re allowed to do, and whether that passport’s still valid.
A JWT is made up of three simple parts, separated by dots:
Header.Payload.Signature
Each part has a job:
- Header indicates which algorithm was used to sign the token (e.g., HS256 or RS256).
- Payload contains “claims” about you: user ID, roles, expiration time, and even custom fields.
- Signature is the cryptographic seal that proves no one has tampered with the token.
Here’s the magic: servers don’t need to “call home” or check a database for every request. They simply verify the signature and – boom – trust the claims inside.
That’s what makes JWTs stateless. They scale beautifully and perform fast.
But with great convenience comes significant risk. If a token leaks, anyone holding it can act as you until it expires. And if it never expires? You’ve basically handed out a permanent keycard.
That’s why innovative teams follow a few best practices:
- Keep tokens short-lived (minutes, not hours).
- Always validate signatures against trusted issuers.
- Use refresh tokens for silent re-authentication without bothering the user.
JWTs made distributed systems smoother, lighter, and faster, but they’re only as strong as their protection. And sometimes, even a passport isn’t enough.
Because what if you need to trust not just the person, but the connection itself?
That’s where we raise the bar to Mutual TLS.
4. Mutual TLS (mTLS): When Trust Must Be Absolute
Imagine a guarded gate. You show your ID to enter, but before you step through, the guard shows you their ID. Only when both sides trust each other does the gate open.
That’s Mutual TLS (mTLS).
In regular HTTPS (TLS), the server proves its identity using a certificate. In mutual TLS, the client must also present a valid certificate, creating a two-way trust handshake.
Here’s how it works:
- The client connects to the server using TLS.
- The server presents its certificate (like any HTTPS site).
- The server then requests the client’s certificate.
- Both verify each other’s certificates using trusted Certificate Authorities (CAs).
- Only if both checks pass does communication begin.
This approach isn’t about user logins or session tokens. It’s about trusting the connection itself. You’ll see mTLS in places where identity assurance is non-negotiable:
- Banking APIs verifying financial transactions
- Government systems exchanging classified data
- B2B integrations where every system must prove its legitimacy
It’s slower to implement and harder to manage, but in high-stakes environments, it’s worth every layer of assurance.
With mTLS, the system truly knows who’s calling, not just through a token, but through a verified cryptographic bond.
And now that the system can identify who you are, the next natural question follows: What exactly are you allowed to do?
That’s the moment we step into authorization: the decision-making brain that follows authentication.
Step 4: From Identity to Access (Authorization Deep Dive)
Authentication answers “Who are you?”
Authorization asks the more complex question: “What can you do?”
Now that we’ve verified identity, we shift to something trickier: controlling access. Once a user proves who they are, how do we decide what they’re allowed to touch, edit, or delete? This is where authorization models come in. Over time, they’ve evolved from simple, static lists to context-aware policies that almost “think” before granting access.
Let’s walk through this evolution, step by step.
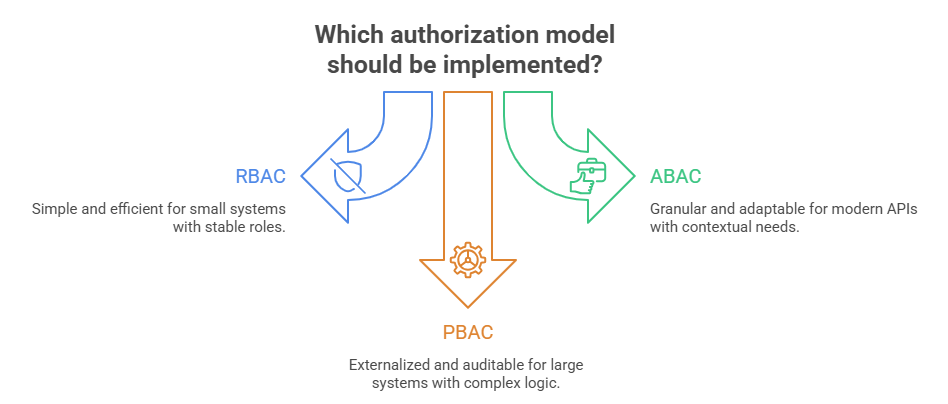
1. RBAC: The Classic Guard List
Role-Based Access Control (RBAC) has long been the default guard at the door. It’s simple, predictable, and when your system is small, it’s beautifully efficient.
You don’t assign permissions to individuals; you assign them to roles. And users simply inherit what their role allows.
Quick example:
- Admin: can create, edit, and delete.
- Editor: can create and edit but not delete.
- Viewer: can only read.
That’s it. Neat and easy to explain to any manager.
Why teams love it:
- Clear, structured, and aligns perfectly with job functions.
- Easier to manage than assigning permissions individually.
- Works well in stable environments where roles don’t change often.
Where it cracks:
- Rigid when you need exceptions (“This editor should only publish in one region”).
- Doesn’t handle context like time, device, or location.
- Role explosion. The bigger the system, the more roles you end up juggling.
Think of RBAC like a wedding guest list. It works fine until you start adding “friends of friends” and “plus ones” – suddenly, the list needs a full-time manager.
2. ABAC: Context is the New King
Enter Attribute-Based Access Control (ABAC), the smarter, more flexible cousin.
Instead of asking “What’s your role?” ABAC asks:
“Who are you, where are you, what are you using, and what’s happening right now?”
Access isn’t binary anymore. It’s contextual.
Example:
“An engineer can deploy only from an office IP, during business hours.”
That one rule already contains multiple attributes: user role, device location, and time of request.
Why modern APIs love ABAC:
- Extremely granular and adaptable.
- Adjusts to changing risk conditions automatically.
- Plays well with compliance, for example, restricting medical data access to specific devices or locations.
But it’s not plug-and-play.
ABAC requires more planning, richer data, and a reliable policy engine to evaluate conditions in real time.
Still, for large or security-sensitive APIs, it’s worth the investment.
3. Policy-Based Access: Externalized Authorization
As systems grow, mixing access logic directly into app code becomes a nightmare. You end up with if (user.role == ‘admin’) scattered across services, making audits and updates painful.
Policy-Based Access Control (PBAC) solves this by externalizing authorization. Instead of hardcoding permissions, you define them in separate, centralized policies managed by engines such as the Open Policy Agent (OPA) or Keycloak Authorization Services.
Your application just calls the engine and asks, “Should this user be allowed to do this?”
The engine checks the rules, considers context, and returns a decision, all without your app needing to know the details.
Why it matters:
- Keeps business logic clean. No tangled if-else permission trees. (Read this if you need help with this step)
- Consistent and auditable authorization across multiple APIs.
- Real-time updates to access rules without code changes.
Think of it as hiring a specialized bouncer who follows a clear rulebook and updates that rulebook daily without bothering the event staff.
At this point, we’ve gone from static roles to dynamic policies, from who you are to what you’re allowed to do under specific conditions.
Now it’s time to combine everything we’ve built so far: identity, tokens, roles, and policies into one working flow.
Because authentication alone doesn’t secure an API, it just opens the door. Authorization decides what happens once you’re inside.
Step 5: Putting It All Together (Implementation Blueprint)
We’ve met every piece of the puzzle: identity, tokens, and access control. Now it’s time to connect them into one living, breathing security flow, the kind that powers real-world APIs at scale.
Let’s walk through what a secure request actually looks like, from the first login click to the final data response.
1. The Client Authenticates via OAuth 2.0
It all begins with identity. A user logs into your application using a trusted identity provider (say Google, Microsoft, or Okta) through OAuth 2.0’s Authorization Code Flow.
The provider verifies their identity and returns a JWT (JSON Web Token) that carries that verified identity and a set of claims (such as roles, scopes, or permissions).
Think of it as a signed access pass with details about who the user is and what they’re allowed to do.
2. JWT Attached to Every Request
Once logged in, that JWT travels with every request.
Each API call includes it inside the Authorization header, looking something like this:
Authorization: Bearer eyJhbGciOiJIUzI1NiIsInR5cCI6…
The API Gateway, your first line of defense, intercepts each incoming request. It checks the token’s signature, expiry, and audience to ensure it’s valid and untampered.
If the token fails validation, the request never reaches the gate.
3. Claims Passed to the Authorization Layer
Once the token is verified, the gateway forwards the user’s claims (their roles, scopes, and attributes) to the authorization service.
Here’s where your chosen model steps in:
- RBAC looks at the user’s role (“Admin”, “Editor”, “Viewer”)
- ABAC might additionally evaluate conditions like device type, location, or time of access
This layer acts like the guard at the building entrance, checking whether the pass grants access to this room at this time.
4. Authorization Decision
The authorization service evaluates the policy and returns one of two responses:
✅ Allowed: The request proceeds to the backend.
???? Denied: The system responds with an HTTP 403 Forbidden.
In modern architectures, this logic is often centralized through policy engines like Open Policy Agent (OPA) or integrated frameworks such as Keycloak Authorization Services. This separation makes authorization cleaner, auditable, and easier to update.
5. Backend Processes Request
If the authorization service gives the green light, the request finally reaches your backend or microservices layer. Business logic runs, data is fetched, and a response is sent back to the client, all while maintaining a clear audit trail of who accessed what and when.
Pseudocode Snapshot: The Flow in Action
| // Extract JWT from Authorization header // Validate JWT signature and claims // Extract user roles and permissions from claims // Check authorization for the requested route // If authorized, process the request |
Even in this simplified view, the flow is clear:
Identity → Token → Verification → Authorization → Execution.
At This Point
Your API doesn’t just trust who’s knocking. It knows exactly which rooms they’re allowed to enter. This precision is what modern authorization is all about: giving users only the permissions they need, no more and no less.
But here’s the thing: even the strongest locks weaken with time. Tokens expire. Credentials leak. New vulnerabilities emerge.
And that’s where our final step comes in: keeping the system alive through continuous monitoring and lifecycle management.
Step 6: Staying Secure Over Time (Token Lifecycle & Monitoring)
Up to this point, we’ve built a strong authentication and authorization framework. The system knows who’s who, what they can access, and enforces it cleanly.
But here’s the catch: security isn’t static. It’s not something you set once and forget.
If authentication is a snapshot, monitoring is the movie. It captures what happens over time, showing you if something starts to drift or go wrong.
Let’s break down what “staying secure” really looks like once your API is live and running in the wild.
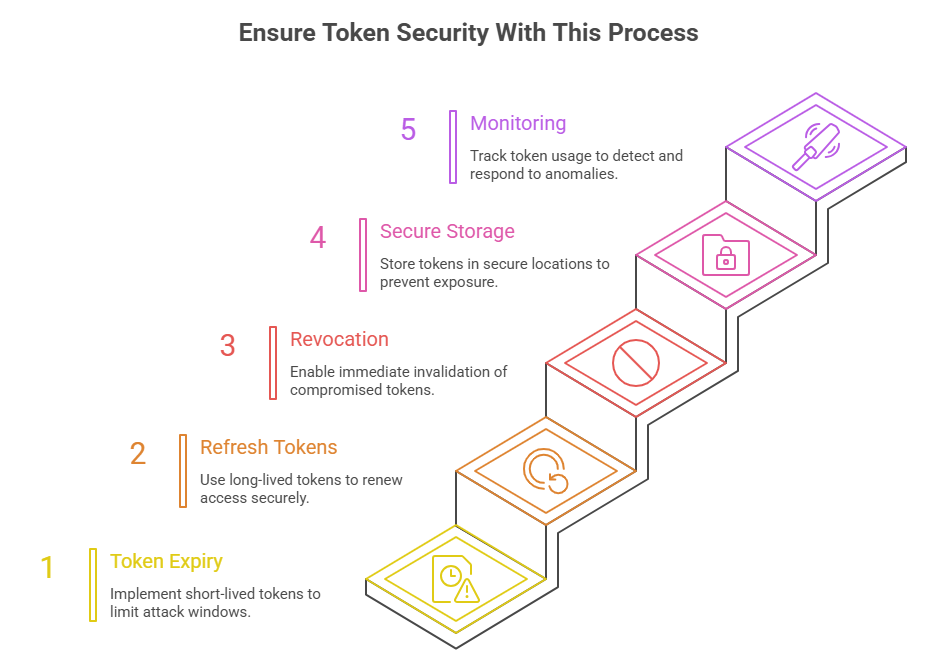
1. Token Expiry: The Power of Short Lifetimes
Every token should have an expiration date. Short-lived tokens (usually 5 to 15 minutes for sensitive APIs) ensure that even if one is stolen, its usefulness is limited.
The logic is simple:
The shorter the token’s lifespan, the smaller the attack window.
Financial apps often issue 5-minute access tokens, while less critical systems might go up to 30 minutes. Whatever you choose, a short expiry is your first line of defense against token replay or misuse.
2. Refresh Tokens: Renew Access Safely
Short-lived tokens are outstanding, but users shouldn’t need to log in every few minutes. That’s where refresh tokens come in: long-lived credentials used to request new access tokens silently.
Handled correctly, they create a smooth, secure balance between usability and safety.
Best Practices:
- Store them securely: use HTTP-only cookies or secure device storage, never localStorage.
- Rotate refresh tokens after each use to prevent reuse attacks.
- Invalidate them immediately if suspicious activity is detected (like login from a new country).
It’s the digital equivalent of reissuing someone’s keycard every time they enter the building.
3. Revocation: The Panic Button That Must Work
No system is perfect. Tokens can be leaked, or permissions may change. When that happens, revocation is your emergency brake.
Your system should be able to immediately blocklist or invalidate tokens in real time, either through a centralized revocation list or simply by enforcing short token lifetimes so old ones die out naturally.
The key is reaction time:
The faster you can revoke, the less damage a compromised token can cause.
4. Storage: Where You Keep Tokens Matters
Here’s a non-negotiable rule: ❌ Never store access tokens in client-side localStorage.
Why? Because XSS attacks can easily expose them. Instead, use:
- HTTP-only, Secure Cookies (can’t be read by JavaScript)
- Encrypted keychains or secure enclaves on mobile devices
On the server side, encrypt stored tokens and use strict access controls. It’s not just about where you store them. It’s about how easily an attacker could reach them.
5. Logs & Monitoring: The Early Warning System
Every token tells a story: where it was issued, how often it’s used, and from where. Monitoring those stories is how you catch trouble before it escalates.
Keep an eye on:
- Multiple refresh attempts within short intervals
- Tokens used from unexpected IP addresses or geolocations
- Repeated 401/403 responses (often a sign of probing or misuse)
Automated systems like SIEM or SOAR can flag anomalies, revoke tokens, or even lock accounts dynamically.
Logging isn’t just for compliance. It’s for early detection.
Mini Security Checklist
Before you close the loop, here’s what a healthy token lifecycle looks like:
- Rotate secrets and refresh tokens regularly
- Use narrow scopes (least privilege possible)
- Monitor token reuse and anomalies continuously
- Keep expiry short and enforce revocation immediately
The Big Picture
Security is a living system, and tokens are its heartbeat. They pulse with every request, carrying proof of trust.
But like all living systems, that heartbeat needs monitoring. Because threats don’t sleep. And your tokens? They shouldn’t either.
Now that we’ve covered lifecycle management and continuous monitoring, it’s time to step back and see the entire journey from a bird’s-eye view: from login to policy enforcement to real-time defense in our final wrap-up.
Step 7: Going Beyond Basics (Zero Trust & Continuous Validation)
If the first six steps built your security system, this one gives it a brain.
Because in 2026, “secure” doesn’t mean trusted once. It means continuously verified.
In the world of Zero Trust, every request must earn trust, even if it comes from inside your own network.
That’s the heart of modern identity security.
1. Philosophy: Never Trust, Always Verify
Traditional security drew a clear line: “inside the network” equals safe, “outside” equals threat.
Zero Trust erases that line altogether.
Every device, every session, every API call must re-prove its legitimacy. No assumptions, no shortcuts.
Three core principles define it:
- Never Trust, Always Verify: No implicit trust, even for internal systems.
- Least Privilege Access: Give users and apps only what they absolutely need.
- Assume Breach: Design every control assuming something, somewhere, is already compromised.
It’s not paranoia. It’s preparedness.
2. Continuous Reauthentication: Because Trust Expires Too
In Zero Trust, logging in once isn’t enough. Users and services are continuously reverified during active sessions.
This can mean checking:
- Whether the device is still compliant (no security patch missing)
- Whether the IP or the location has changed unexpectedly
- Whether the user is behaving normally or showing signs of compromise
Continuous validation shuts the door on session hijacking and token replay attacks, turning “once secure” into “always secure”.
3. Behavior-Based Checks: Spot the Subtle Anomalies
Zero Trust systems are innovative. They don’t just validate credentials; they watch patterns.
Using AI and behavioral analytics, they flag anomalies like:
- Log in from Delhi at 10 AM, then from Berlin at 10:05 AM
- Sudden API calls to unfamiliar endpoints
- Data downloads larger than normal user limits
When these behaviors appear, systems respond automatically with step-up MFA, session freeze, or policy enforcement.
Because proper security is proactive, not reactive.
4. Context-Aware Access: Decisions That Adapt in Real Time
Think of this as dynamic authorization on steroids. Instead of static rules, Zero Trust evaluates context:
- Device posture (is antivirus on? OS updated?)
- Network type (office LAN vs public Wi-Fi)
- Time of day or geographic location
Access policies shift accordingly. Stricter MFA on public networks or limited access after hours. This constant adjustment keeps your API aligned with real-world risk.
5. Adaptive Authentication: The Modern Identity Provider Advantage
Leading identity platforms like Azure AD, Okta, and Auth0 already build Zero Trust principles right into their architecture.
They offer:
- Risk-based MFA prompts when behavior seems off
- Device health scoring before granting tokens
- Adaptive policy enforcement that evolves as risk changes
This is how enterprises scale Zero Trust – not by reengineering everything, but by letting modern IdPs handle continuous validation in the background.
6. Real-World Adoption
Zero Trust isn’t just a buzzword anymore. It’s a mandate.
- US Executive Order 14028 requires all federal agencies to adopt it.
- Enterprises are deploying Zero Trust to protect hybrid clouds, remote teams, and API-driven ecosystems.
- Even small startups are embracing it to reduce insider threat and lateral movement within their networks.
The result? A world where access is consistently earned, never assumed.
7. Looking Ahead: Identity in a Decentralized World
We’re entering an era where identity itself is transforming.
The rise of self-sovereign identity (SSI) and verifiable credentials means users could soon own and control their digital identities, not just borrow them from big providers.
As we evolve toward a decentralized, privacy-first web, Zero Trust won’t just verify access. It’ll respect ownership.
Final Thought
“Zero Trust isn’t about locking the doors tighter.
It’s about checking who’s walking through them, every single time.”
Check out:
Next (Step 8), we close the loop by tying together everything from Step 1 to Step 7 into one cohesive mental model: a security-first API flow that never stops learning, validating, and adapting.
Step 8: The Future of API Identity
If you think identity stops at OAuth tokens, think again. The next decade of API security will be defined by decentralization, privacy, and continuous validation, where trust is earned, not assumed.
We’re moving from a world of passwords and tokens to ecosystems of verifiable trust.
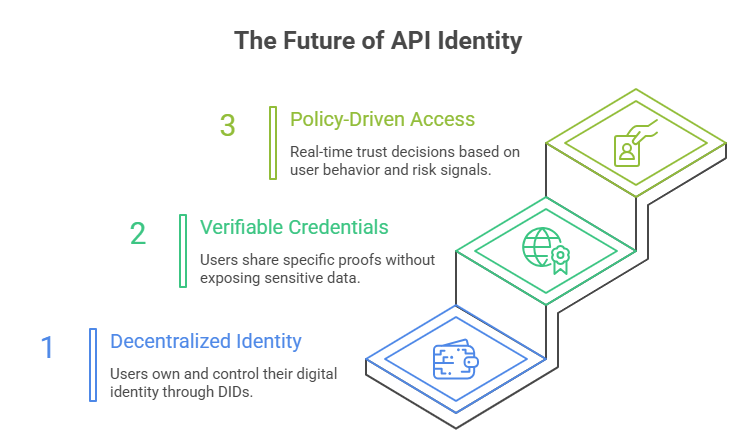
1. Decentralized Identity (DID): Users Own Their Identity
For decades, digital identity has been something you log into: Facebook, Google, or a corporate SSO. In the decentralized model, you become the source of truth.
How It Works:
Each user generates a unique Decentralized Identifier (DID) tied to a blockchain or distributed ledger. Instead of central servers, your identity lives inside a secure wallet that you control.
Services verify your identity cryptographically, with no passwords and no middlemen.
Why It Matters:
This flips the power dynamic. Users can prove who they are (say, over 18 or a verified developer) without oversharing sensitive data. It also removes single points of failure. No central breach can expose everyone.
Example:
Imagine logging into a fintech API using your government-issued DID. No passwords, no OTPs, no stored credentials. Just a verifiable signature that says, “Yes, this is me”.
2. Verifiable Credentials (VC): Proof Without Exposure
In the decentralized world, identity isn’t a database entry. It’s a set of proofs.
What It Is:
A Verifiable Credential is like a digital certificate that confirms specific claims (your job title, degree, age) using cryptography. You can share only what’s needed, proving your qualification without disclosing your employer, for instance.
Real Benefit:
APIs can authenticate users without collecting sensitive data, reducing privacy risk and regulatory burden. Trust becomes portable: once verified by one trusted entity, your credential can be reused across ecosystems.
3. Policy-Driven Access: Real-Time Trust Decisions
Static roles and claims won’t cut it in dynamic, hybrid environments. Modern systems need policy engines that adapt access in real time, analyzing user behavior, device health, and risk signals.
Think of it like this:
Instead of saying “admins can always do X”, policy-driven models ask, “Should this admin do X right now, from this device, under these conditions?”
Outcome:
Security that’s contextual, continuous, and intelligent – the core of a Zero Trust future.
4. AppSentinels: Building for What’s Next
AppSentinels is already investing in these next-gen identity models, preparing teams to adopt:
- Decentralized identifiers that remove central trust bottlenecks.
- Verifiable credentials that streamline privacy-first authentication.
- Policy-based enforcement that adapts to modern threat dynamics.
By bridging decentralized identity with continuous validation, AppSentinels helps enterprises evolve from token-based trust to evidence-based trust, where every request, every user, every device continuously earns its access.
But before we end, let’s make sure we don’t trip on the basics because even the most futuristic identity systems still depend on solid fundamentals.
Step 9: Common Pitfalls and How to Avoid Them
Even with the best tools and intentions, most API breaches come down to the same five mistakes – the kind that look small on paper but cost millions in reality.
Let’s call them out, fix them, and make sure your APIs don’t fall for the same traps.
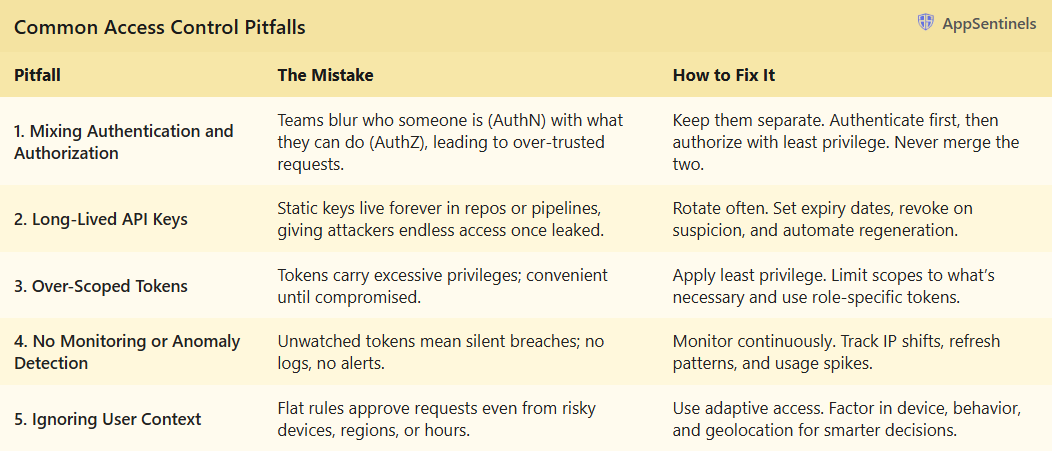
1. Mixing Authentication and Authorization
The Mistake:
Teams often blur the lines between verifying who someone is (AuthN) and checking what they can do (AuthZ).
The result? Over-trusting requests that never should’ve passed.
The Fix:
Keep the two logics separate and layered. Always authenticate first to confirm identity, then authorize with fine-grained permissions. Never shortcut the flow.
2. Long-Lived API Keys
The Mistake:
Static, never-expiring API keys that live forever in codebases or CI/CD pipelines. If they leak, attackers get indefinite access with no alarms, no expiry.
The Fix:
Rotate. Expire. Revoke.
Build lifecycle policies that automatically expire keys, notify on leaks, and enforce regeneration. Treat keys like perishable goods, not permanent credentials.
Check out:
3. Over-Scoped Tokens
The Mistake:
Granting tokens with far more privileges than they need – “admin by default”. It’s convenient until that token lands in the wrong hands.
The Fix:
Always apply the principle of least privilege. Limit scopes tightly to the actions required, and use role- or purpose-specific tokens for different API consumers.
4. No Monitoring or Anomaly Detection
The Mistake:
No eyes on your tokens. No logs. No anomaly detection. Attackers love silent systems.
The Fix:
Instrument your APIs.
Track refresh patterns, IP changes, and suspicious usage bursts. Integrate alerts with your SIEM or AppSentinels dashboards to detect misuse in real time.
5. Ignoring User Context
The Mistake:
Static rules that treat every login or API call the same, even if the device is infected, the IP is foreign, or the time is odd.
The Fix:
Adopt context-aware access.
Factor in device posture, geolocation, and behavioral patterns before approving requests. Adaptive access isn’t “extra”. It’s the baseline for modern trust.
Security isn’t a box you tick. It’s a muscle you build.
And just like any muscle, it grows stronger only with discipline, iteration, and awareness.
Your API Security Roadmap
Over the past few sections, we’ve moved from confusion to clarity, from static setups to continuous security. You’ve learned how to identify who’s calling, control what they can do, and keep validating every interaction because identity isn’t a one-time event; it’s a living signal.
The Core Takeaways
- Know who’s calling.
Use strong, modern authentication methods such as tokens, OAuth, or federated identity. - Control what they can do.
Enforce precise authorization with least privilege and dynamic policy checks. - Keep checking.
Continuously monitor, rotate, and adapt. Security never sits still.
A Final Thought
APIs don’t just connect software. They connect trust, reputation, and the lives of your users.
Your job isn’t just to protect endpoints. It’s to preserve everything that flows through them.
And that’s precisely where AppSentinels comes in. From token hygiene to anomaly detection and Zero Trust enforcement, AppSentinels helps you operationalize API security as a living discipline, not a once-a-year checklist.
So you can build systems that don’t just scale, but stay secure by design.
Frequently Asked Questions
How do I choose between OAuth 2.0 and API keys for my project?
What’s the difference between access tokens and refresh tokens?
Can I implement API authentication without a third-party service?
How do I test if my API authentication is actually secure?
What happens if someone steals my JWT token?
Do I need different authentication for mobile apps vs. web apps?